
Help Resources
Slideshow
The Slideshow atom is a useful tool for making a webpage look more exciting and engaging for your audience. Images always make webpages look better, and adding movement to them draws the eye and keeps interest. They are also a useful way to get messages to your audience.
To put a slideshow, or 'Slider', on a webpage just select an atom and change it to the type 'Slideshow Atom'.
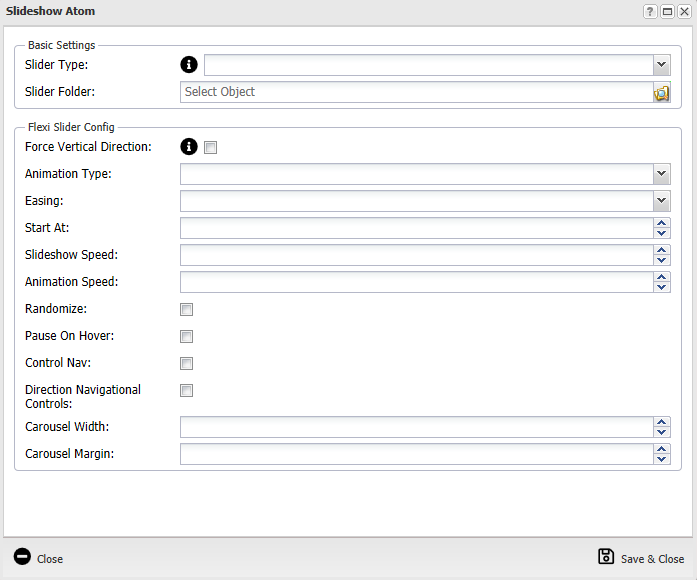
The Atom gives you the following options:
- Slider Type - Change the type of slider. Flexislider is the most common, meaning the size of the slider will stretch to the size of the largest image.
- Slider Folder - This is the folder with your slider images in. Click the folder icon on the right to browse and select it.
- Force Verticle Direction - The default slide is horizontal, but ticking this will change it to vertical.
- Animation Type - You can choose for your images to either slide or fade in.
- Easing - If you choose 'Slide' animation type above, then you can also choose how it slides in - Linear or Swing.
- Start At -
- Slideshow Speed - Configure the speed of the slideshow - the higher the number the longer each image displays. We use around 2000 - 5000.
- Animation Speed - Configure the speed of the animation - the higher the number the longer it takes. We use around 2000.
- Randomize - Tick this for the order of your images to be random, otherwise they will be in order created.
- Pause on Hover - Tick this to make the slider animation pause when a user hovers their mouse over it. This is useful if you have text or important information on your slider images that your users may want more time to read.
- Control Nav - This gives a small option below the slider for users to choose which image to jump to view.
- Direction Navigational Controls - This gives you arrows to the sides of your slider so users can go back and forth to other images.
- Previous Text - This is the text that will appear below the navigational control that lets to user view the previous image.
- Next Text - This is the text that will appear below the navigational control that lets to user view the next image.
- Carousel Width -
- Carousel Margin -
Slider Image Object Type
As mentioned above, the Slideshow atom needs to be told what folder the Slider Image objects are in. The Slider Image object is very similar to a normal image object, with a few additional tabs.
Link Options Tab
This gives you the ability to make your slider image a link that can take the user somewhere.
For an external link select 'External URL'
- Type in the address of the site you want the user to be redirected to (e.g. http://www.google.co.uk/) Make sure to include the http
- Select the Link Target (how it opens) - For external sites you may want this to open in a new window.
For an Internal link select 'XPOR Object' -
- Use the browse button to navigate and select the internal page you want to direct the user to
- Select the Link Target - For internal pages you may want this to open in the same window.
Click Save or Save and Close.
URL Tab
Object Image Tab
This is where you upload your image.
Select the upload button and the browser window will appear from you to select an image from your PC.
Select your image and click Upload.
Publishing
Your Slider image will only appear on the slideshow if it is set to 'Published'. Go to the details tab and click 'Published'.
Publishing your image at selected dates
Images can be Published, Unpublished, or Archived. This means you can work on the image and set it to come online at a selected date. For example, you could have a Christmas slider that started publishing on 1st December and Finished publishing on 26th December.
Go to the details tab of the slider image.
- To set a published date use the Start Publishing field.
- Type the date in or click the drop down on the right of the the field to use the pop out time and date selector.
- To leave this online leave the Finish Publishing field blank.
- To set an offline date use the Finish Publishing field.
- Type the date in or click the drop down on the right of the the field to use the pop out time and date selector.