Help Resources
Configuring Render Rules
This is a guide on writing render rules, for an explanation of what render rules are and what they can be used to do see additional help resource.
Where To Go
Render rules can only be set on the columns of grids. If you have a grid you wish to add a render rule to then follow these steps:
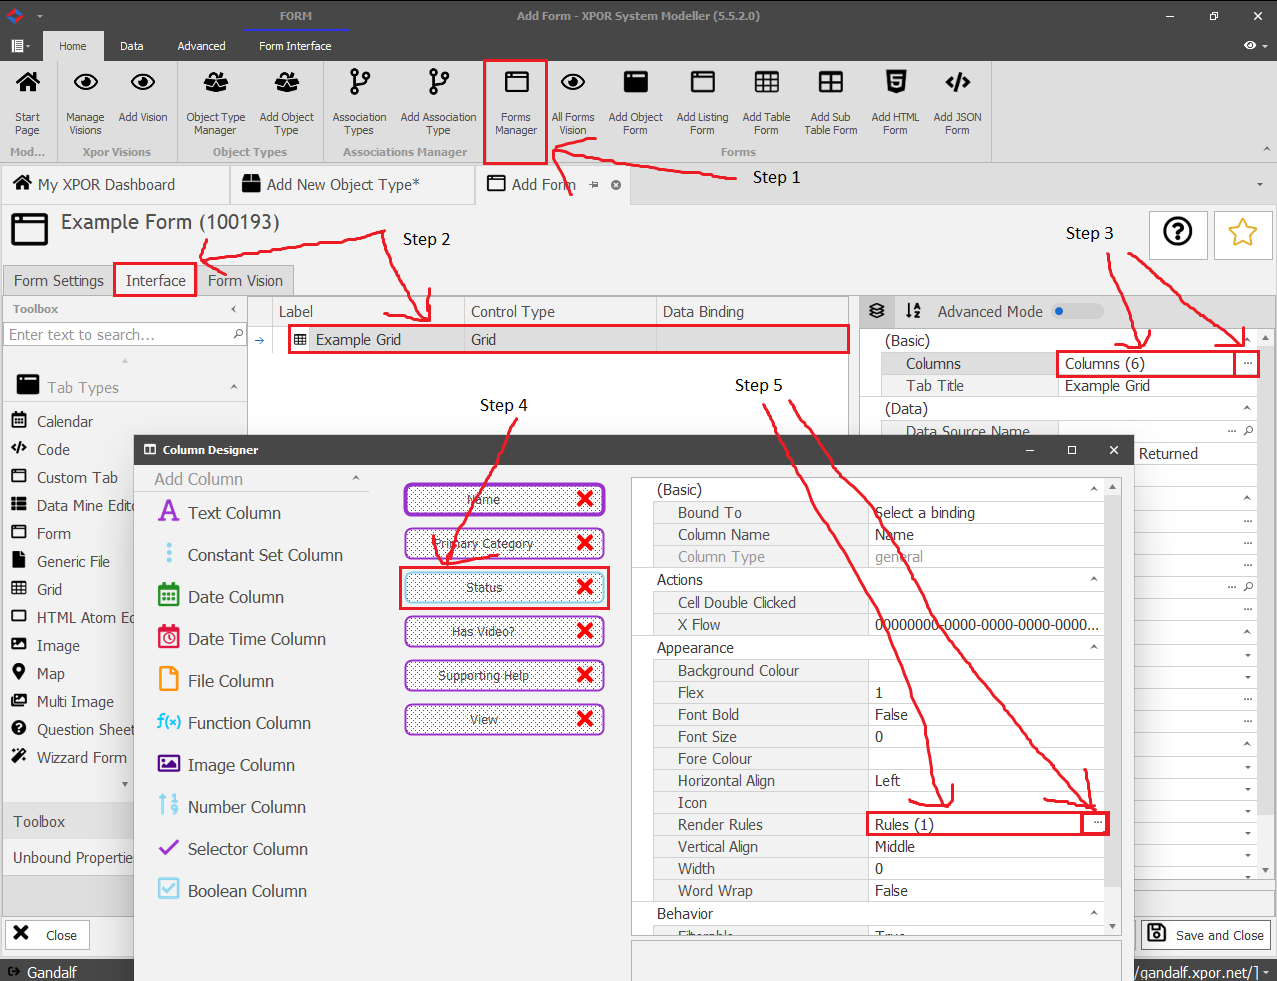
1) In Xpor System Modeller, navigate to the form that contains your grid using Forms Manager.
2) Go to the interface tab of the form and then double click on the grid you wish to add a render rule to.
3) Open the Column Designer by clicking on the 'Columns' property in the menu on the right and then clicking the '...' button that appears (see image below).
4) Click the Column that you wish to add a render rule to
5) Open the Renderer Designer by clicking on the RendererRules property in the menu on the right and then clicking the '...' button that appears (see image below).
Editing/Adding Render Rules
Once you have opened the 'Renderer Designer' follow, to create a new blank rule, click add in the bottom left of of the window.
To edit a rule, single clicking on it to open it (if you have just made a new rule then it will automatically open).
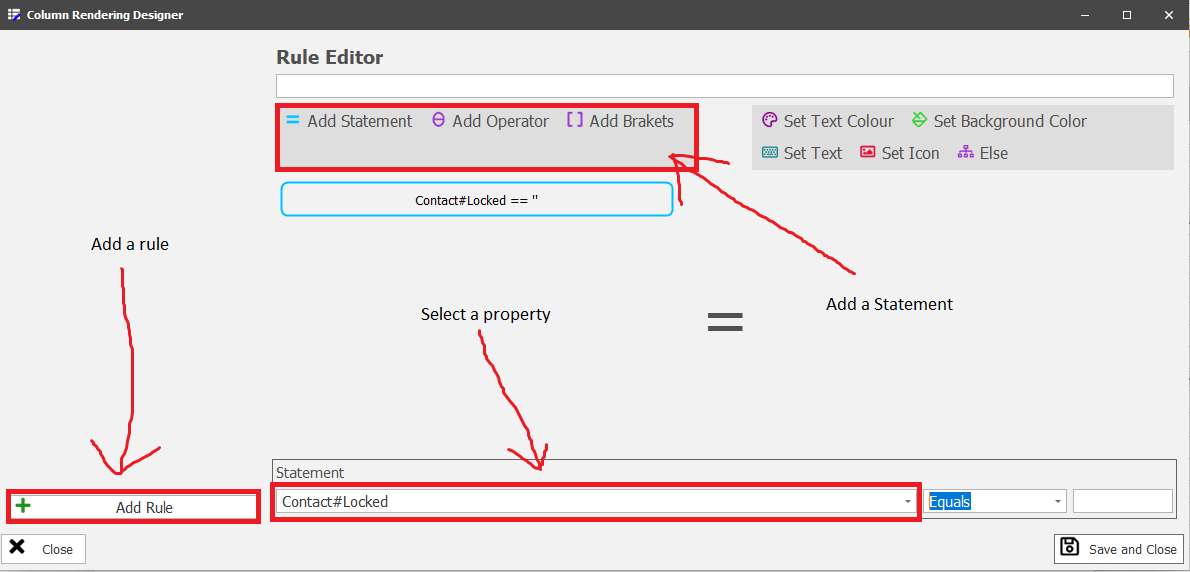
How to Write a Statment:
1) Click the dropdown arrow next to the Add Item button (see image below) and click Add Statement. Then click the box that appears.
2) Several dropdown menus will appear at the bottom of the window, click the first one from the left to select the property you wish to base this statement off of.
3) Depending on what the type of property you select, the remaining dropdowns may change e.g. constant set properties will provide you with two dropdowns, one of which is the list of values the constant set can have. Complete the remaining controls, at the bottom of the window, as appropriate.
4) Now you may add additional items to your statement. You can build your statement up using additional statements and with AND and/or OR operators as you would with boolean algebra. Additionally you may add brackets to your statements, these will order the priority of your statements exactly as they do in boolean algebra (Statements inside of brackets are calculated first). e.g. 'Is a = b' AND ('Is c = d' OR 'Is e > f') The output of this will be true if a = b and either c = d or e > f
For example, you want to set the text of a row in your grid to turn grey if the object being listed has it's 'WorkStatus' property set to 'Complete':
E1) Add a statement as described in step 1.
E2) The property that you need to base the statement off is the 'WorkStatus' property, so select this properety from the first dropdown.
E3) In this case the 'WorkStatus' property is a constant set, so there will be two additional drop downs that you must complete. From the first of these two you should select 'Equals' because you only want the exact case where the 'WorkStatus' property set to 'Complete'.
E4) In the final drop down you must select what you want the 'WorkStatus' property to equal, so in this case you select 'Complete'
Additional Tips:
.In some cases (the same as in step E4) you will be presented with a fixed set of options that your property can equal. However if these fixed options don't include the value you need then you can right click the dropdown and select 'Convert to value'. This will allow you to manually type the value you want.
.When selecting the property you wish to base this statement off of (the same as E2) you don't have to scroll all the way through the list of properties. Instead you can manually type out the property and the dropdown menu will narrow the options it lists accordingly.
.If you select a date property to base the statement off of and you wish to compare it to todays date, type new Date() into the box at the bottom right (see image below) e.g. if you want the text to turn red when a particular date property (maybe a 'Planned Date' property) is in the past.

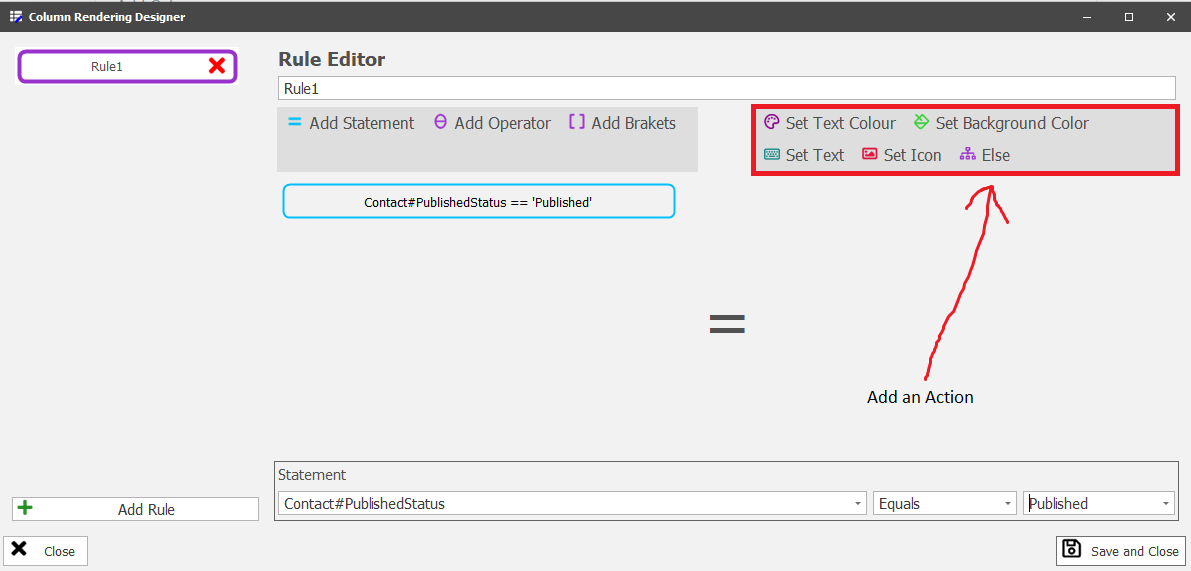
How to Write an Action
1) Click the dropdown arrow next to the Add Action button (see image below), then click one of the following options which will add that Action to your render rule:
i) Change Text Colour: Click on the Action and either select the colour from the pre-defined options or manually type in the colour you want using the RGB Colour model in the format RRR, GGG, BBB
ii) Change Background Colour: Click on the Action and either select the colour from the pre-defined options or manually type in the colour you want using the RGB Colour model in the format RRR, GGG, BBB
iii) Set Text: Click on the Action and type the text into the Set Text box. Note, this text will replace the text that would have otherwise been displayed because of the data index e.g. if you set a column's data index to display the AccountStatus of a contact object but you also set a render rule to set the text 'Web Master' if the AccountStatus is set to Admin. Then in this case the column will display the AccountStatus, except when it is Admin, then it will display Web Master instead.
iv) Set Icon: Click on the Action and then to choose the icon click the '...' button that appears in the bottom right. Note, unlike Set Text, this icon will display in addition to anything else already set to display.
2) You may also set an Else Action. The output from the Statement of the Render Rule is either true or false, your Actions will occur if the output is true, but using the Else Action you can also set some other Actions to occur if the output is false. To do this:
i) Click the dropdown arrow next to the Add Action button (see image below) and then click Else.
ii) All Actions above the Else statement will occur if the output of the statement is true, all actions below the Else statement will occur if it is true.