XPOR has the following tools that you will need (which are explained in the following sections):
- Photo Gallery Object
- Image Object
- Gallery Atom Type
Photo Gallery Object
The 'Photo Gallery Object' is your gallery and is the first thing to create.
- Log into your XPOR website, go to the admin system and navigate to the folder where you would like to create your Photo Gallery.
- Click 'new' select the object type 'Photo Gallery' and type in a name for your new Photo Gallery. Click 'Create'.
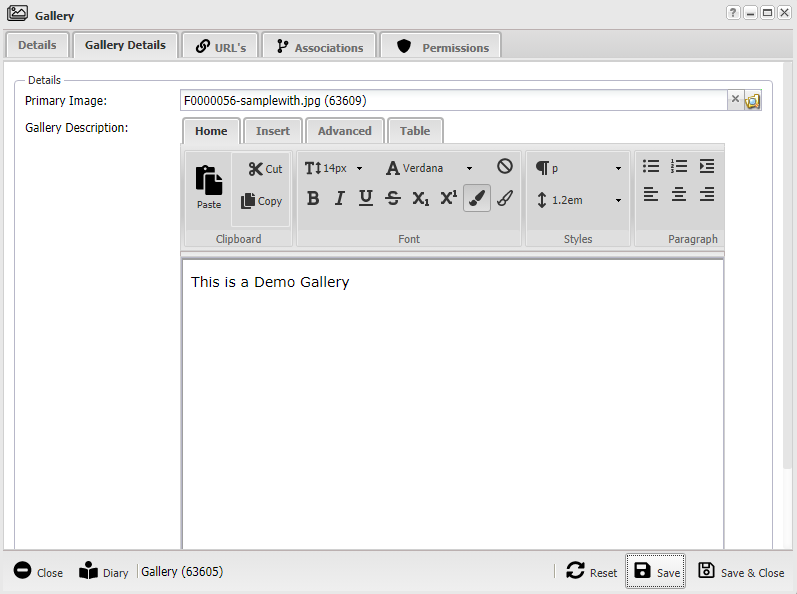
When you view your Photo Gallery Object you will notice that it has the standard tabs, plus one unique tab - 'Gallery Details'.
Gallery Details Tab
- Primary Image - This is what the user sees as the Gallery's cover image on the host webpage. You can browse to select an image from your website's files by clicking the folder icon to the right.
- Gallery Description - This is what appears under the Gallery Name and Primary Image on the main page. It is an HTML field so you can add things like hyperlinks.
Image Object
A Photo Gallery contains its Images as Children.
In your Gallery:
- Click 'new', then type in a name for your new image and select the object type 'Image'. Click 'Create'.
- The object will open and you can upload your image file.
OR, for a quicker method:
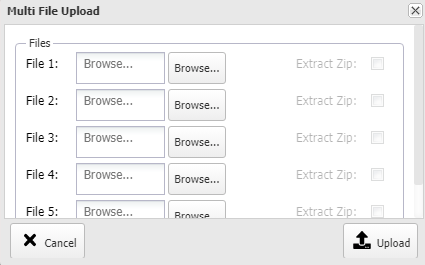
- Click 'multiadd', then browse to the location of your image file on your computer to upload it. You can also select a zip folder to upload large numbers of images at once.
The Object Name of the Image will appear as it's title. If using the quicker Multiadd method then the object name will be the name of the file you selected. You can change this easily by editing the image object.
Gallery Atom
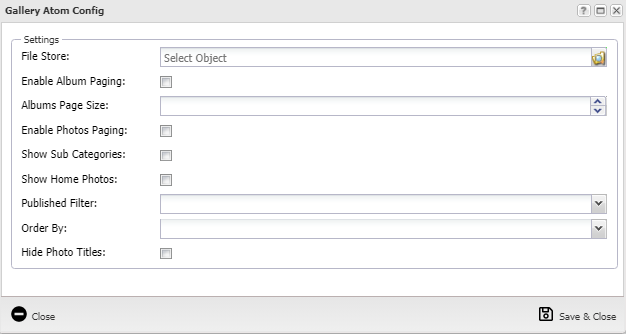
The Gallery Atom type is where you set up your Gallery(ies) to display on a webpage. The Photo Gallery atom can be set as a defaults in a Template. Alternatively, change an existing atom to a Photo Gallery, by right clicking the Atom, (or hold CTRL + left click) to change it's atom type. Select Photo Gallery.
- File Store - This is where you tell XPOR the location of the Gallery(ies) you want it to display. Click the folder icon to the right to navigate and select the folder where you created your Photo Gallery Object(s).
- Enable Album Paging - This option allows the albums to be shown on pages when they get to a certain number.
- Albums Page Size - The maximum number of albums to be shown on each page.
- Enable Photos Paging - This option allows the images to be shown on pages when they get to a certain number.
- Photos Pages Size - The maximum number of images to be shown on each page.
- Show Sub Categories - This will allow you to show and add galleries within galleries.
- Show Home Photos - This will allow you to show and add images to the first view of your galleries.
- Published Filter - If you plan to set published dates on your galleries or images then you can use this option to make sure only the images/galleries you want to appear do.
- Order By - This allows you to change the rule to decide what order the galleries and images display
- Hide Photo Tiles - The Photo title is the Image Object Name, but you can tick this to hide it.
Gallery Administration from the Front End
Most administration can be done from the front end, and galleries are no exception. You can add Photo Gallery and Image objects on a webpage with a Gallery Atom.
Adding a new Photo Gallery from the Front End
- Navigate to the page that shows your galleries and click the '+' icon in the top left of your screen.
- A large '+' icon will appear - click this to create a new gallery.
- Note: Photo Gallery Object is described earlier in this article
Adding a new Image to a Gallery from the Front End
- Navigate to the page that shows the contents of your gallery and click the '+' icon in the top left of your screen.
- Two large '+' icons will appear - The top one creates a new gallery within the current one, the bottom one adds new images within the current gallery.
- Note: Images are described earlier in this article


